Step by Step instructions for how to knit mittens

I started knitting when I was seven- and I was pretty terrible back then. It's something that always kind of stuck with me into adulthood and slowly I got better. When I was a sophomore in college I decided I wanted to branch out from hats and scarfs and try mittens. I had seen someone making mittens many years ago and the four needles always fascinated me. Turns out it's not that hard to do. This is my favorite mitten pattern- I have made hundreds of mittens over the years and this pattern is engrained in my head so I thought I'd share it.
Materials List:
4- Double pointed needles: Size 5. They typically come in packs of 5 which is nice because you can use the extra needle to hold the thumb stitches until you are ready to work the thumb
1 skein of medium weight yarn. This is your basic every day yarn. I find one skein typically makes 1 pair of men's mittens with a lot of extra,
2 pairs of women's mittens and 3 pairs of children's mittens
Scissors, needle- I prefer to use an upholstery needle with a bigger eye
Measuring tape- I prefer a flexible sewing one but you can also use a ruler or whatever you have
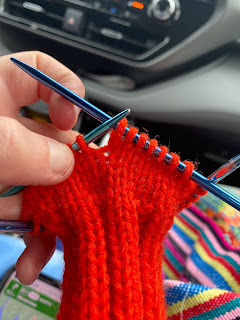
For each part of the pattern I will list three numbers- one for each size. They will be in order of Men's, Women's and children- Obviously follow whichever size you are wanting. In the pictured example I made a women's size mitten.
Cast on (44, 36, 32). I prefer to cast on to one needle and then divide onto a total of three. Women's and children's I put 12 stitches on each of the additional needles and the original needle becomes the middle needle. This is helpful for counting and keeping track of where you are in your pattern. For men's sizes I found it works best to put 16 stitches onto the two additional needles leaving the original needle in the middle. Ideally you want less stitches on the middle needle because you are going to add a lot for your thumb and its hard to control with a ton of stiches on that one needle.


Using the 4th needle begin knitting K2 P2 to create the ribbing pattern. Continue this until the cuff reaches (3.5, 3, 2.5) inches long

Once the cuff reaches your desired length stop the K2 P2 pattern and knit all stitches until the entire piece is (4.5, 3.5, 3) Inches long

Starting the thumb- this looks intimidating but is not hard once you do it a few times.
Row 1: Knit (22, 18, 16) Add one stitch- (I prefer to do this by slipping my needle in the small space from the previous row and knitting that stitch) Knit all remaining stitches
Row 2: Knit all stitches (including the one you just added)
Row 3: Knit (21, 17, 15) Increase 1 stitch, Knit 3, Increase 1 stitch, Knit to end of round
Row 4: Knit all stitches
Repeat Rows 3 &4, Instead of 3 the next time you have 5, 7, 9, 11, 13 as you continue to add 2 stitches each round. Continue this until you have (17, 15, 13)

Once you have added your desired amount of stitches beginning the next row Knit (21, 17, 15) then either using an extra double pointed needle or a stitch holder move the (17,15,13) stitches that you have added to the needle and away from the rest of the work.
After you have removed the stitches away from the rest of the mitten you need to knit to the stich that remains on your work. This first stitch connect the mitten back together can be a little difficult and it won't be your best stitch ever but is important for it be tight to connect the mitten back together.
NOTE: For women's mittens only you need to cast on and knit one stitch before connecting the work. Its not the end of the world if you forget to do this but it makes your numbers come out correctly when you go to do the top of your mitten.

Continue to knit all stitches until the entire mitten measures (10.5, 9, 6.5) inches in length.

Creating the decrease: Once you have gotten your mitten to the desired length you will begin to start the decrease to give it the domed shape.
Row 1: Knit (5, 5, 4) Knit two together, continue this until the end of the row
Row 2: Knit all stitches
Row 3: Knit (4,4,3), Knit two together, continue this until end of row
Row 4: Knit all stitches
Row 5: Knit (3,3,2), knit two together, continue until end of row
Row 6: Knit all stitches
Row 7: Knit (2,2,1) knit to together
Children's row 8: Knit two together across the row
Men's and Women's Row 8: Knit all stitches
M&W Row 9: Knit 1, knit two together, continue to end of row
Row 10: Knit two together across the the row
I typically give myself a 3-4 inch tail and cut the working yarn. Using the upholstery needle I thread the yarn back through the remaining stitches on the needle to prevent them from unravelling. You can secure this off now or I typically wait until the end because it is hard to turn the work inside out with the thumb stitches still active.

Creating the thumb. This seems to be the area that gives people the most grief and it gave me a lot of strife initially. From your stitch holder or extra needle divide the stitches back onto three needles.

Then leaving myself a 3-4 inch tail I start knitting. This can be a little awkward the first round because it doesn't feel that secure but don't worry it's ok. It will become more secure as you knit more rounds. I also like to give myself a nice tail to secure it really well at the end.
Knit all the stitches I have found that I like to pick up a stitch at the end of the row off of the original mitten and at the beginning of the next row. I feel this gives the thumb more security to rest of the mitten.

Knit all rows until your thumb measures roughly (2, 1.5, 1) inches

Thumb decrease: this is similar to your previous decrease just less stitches
Men's and Women's:
Row 1: Knit 2, Knit two together, continue until end of row.
*Note this doesn't come out even. That's ok it still works
*Note this doesn't come out even. That's ok it still works
Row 2: Knit all stitches
Row 3: Knit 1, Knit 2 together for end of row
Row 4: Knit two together to end of row
Children's
Row 1: Knit 1, Knit 2 together until end of row
Row 2: Knit two together until end of row
Same at the hand part of the mitten- using the needle cut the working yarn and sew the stiches so they don't unravel.

Sew in your tail from beginning the thumb. I like to turn my mitten inside out and knot each tail and sew it into my work before cutting the excess off to prevent any unravelling.
AND that's it!!
it can be a little intimidating at first but it's pretty easy once you get the hang of it.


Comments
Post a Comment