How to build and install a modern barn door

Under our stairs we have a coat closet that we call "The Harry Potter space" it is a tiny coat closet and when we moved into the house there was an accordion style door attached to this closet. When it is open the door would stick out roughly a foot into an already narrow hallway. Needless to say this door lasted maybe a week before Max and I couldn't stand it.
I still wanted some sort of door because its an ugly coat closet. Originally I considered a pocket door but because of how the stairs were built we quickly discovered that this was not an option.
Then I started considering a barn door. The only place I had ever really seen barn doors was on "fixer upper." I liked the concept of the barn door but I didn't want it to be super "farmhouse-y" for lack of a better term. Also just doing a quick search I discovered that barn doors are pretty expensive for an interior door. Then I got the idea to build myself a door that was more my style.
Building the Door
I don't really know what the style is called but I like classic, simple lines. I wanted the door to fit in with the rest of the house, but I also felt like it would be dumb to buy a 6 panel door and hang it. I didn't think that would look too great.
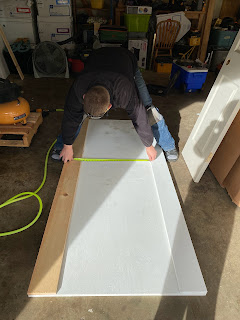
Step 1: Determine the size of the door that you need.
We measured the opening of our door and then added a few inches to each side and the top. We then went to Home Depot and purchased 3/4 inch plywood and they cut it to the size that we asked for.
You also need to account for the amount of wall space. However big you make the door you need to make sure you have that much wall space next to it for the door to move to when you want to access the closet.
Step 2: Determine the Design.
To make the door more visually appealing I bought 3 1X6's and put one on either side and then used the scraps to mount 4 horizontally on the door. We tried to space the horizontal 1X6's equal distance from each other to make it the most visually appealing. Make sure you do the math to determine how many 1X6s you need. I purposely bought less than we needed because I knew we had a lot of scrap 1X6 pieces left over from other projects. I saw this as an opportunity to get some wood out of my garage but if we didn't have that we would've needed 4 1X6s.
Step 3: Wood fill and paint.
We used our nail gun to install all the wood pieces and wood glue when we remembered. To hide all the nail gun holes and lines from putting scrap pieces together we used wood filler like crazy. You can see from the pictures that I hard started painting the plywood a head of time- that plywood just sucks up so much paint. I put at least 4 coats of paint on it just to make it a nice bright white.


Installing the barn door
Step 1: Framing the existing opening.
We opted to put basic trim up around the existing opening so that when the door is left open (as it inevitably is) the door still looks finished. We used basic MDF boards roughly 1X3 painted white (I literally buy white paint by the galloon at the rate that I've been going through it recently.)
Step 2: Hanging the barn door slider
We purchased a barn door installation kit from Home Depot for roughly $60. I opted to spend the extra money for the soft close option and I am so GLAD that I did. If your barn door is more decorative and is not going to be a highly used door then I would say you could skip it- but I knew this door would get a lot of use and it is right in the middle of my house. I can just imagine my children and my nieces and nephews slamming that door back and forth and driving me crazy.
So the biggest thing I learned from installing a barn door is that you need to make sure the sliding system is very secure. This door is pretty heavy and we didn't want it being shoved too hard and falling off the wall.
So you have essentially 3 options:
1. Pray that you get lucky and the mounting sections of the hardware line up with your studs (haha). I would really only suggest this if your house is a new build and you can pre-plan the exact location of your stud placement.
2. Install the system directly to the wall and use drywall anchors where the mounting sections don't line up with your studs. Ehhhh- don't get me wrong I love drywall anchors but I was very anxious about them taking the weight of the door plus the movement.
3. Mount a 1X4 to the wall (specifically locate all your studs and screw the board into all the studs it touches) then mount the sliding hardware to the 1X4. This is ultimately what we did because we thought it would be the most secure and the least painful


The basic trim and the 1X4 installed
The sliding system mounted to the 1X4
Step 3: Mount the wheels on to the door and put the wheels on the track
This was relatively easy for us- Max just drilled it right into the door. From there you just set the wheels on the track and it is installed! We also added a cute handle that I purchased from Lowes for easy opening
And that's it! Overall we really like it and found it to be a fairly easy project. The main reason it took so long to finish it was the amount of paint that the door required. Plus we started this project in early December and then Christmas kind of took over so parts of it sat in the garage for a while. If you were very focused on it I would say you could get done over a weekend depending on how many coats of paint yours required.
We probably spent roughly $100 on this total project which I considered to by pretty good. Online the price for a barn door and install kit is around $300 depending on the door. New interior slab doors cost roughly $50 and pre-hung doors are roughly $100 so I just viewed this as getting a new interior door.


Comments
Post a Comment