DIY Paper Rose Shadow Box with Cricut
So I am always looking to try new things with my cricut. One random day while I was exploring Pinterest I discovered that you could use cricut to make paper flowers. I thought this was really neat but I didn't necessarily know what to do with this information.
Then I came across ombre rose shadow boxes and I thought they were really cool. One of my friends had recently had a baby named "Hallie Rose" and I thought that the paper roses would be a really cool thing to make for her room.
Materials List:
-Construction paper, I found that the major crafts stores carry construction paper in ombre already! You can pick the color scheme of your choice and buy one pack of paper. Pro-tip if you have time to wait this is an item that goes on sale pretty regularly- especially at Michaels and Hobby Lobby.
-Shadow Box- I again got mine on sale. You need a shadow box rather than a regular frame in order to not flatten the roses
-Quiling tool- this one I had to buy on Amazon but it was pretty cheap and hopefully I will do this again. I looked at every major craft store before buying it online and I could not find it.
- Glue dots- I have seen other people use hot glue guns to do this but I thought glue dots would be way less painful
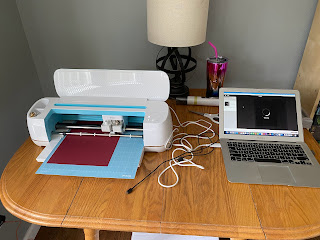
Step 1: Upload your design to cricut design space and cut out your desired amount of roses
I downloaded this free svg file:____ and uploaded it to cricut design space. I duplicated the file and then made it so that I could get two rose cut outs per 1-8.5 x11 page. One of my tips to do this correctly is to make a box in design space that is 8.5 x 11 and then double check that they both fit inside the parameters. I also like in design space when you go to cut your paper you can select "Material Size" and 8.5 x11 is a selection so that the circut will be forced to cut the object within those parameters.
I found that by using the light mat (blue) instead of the standard mat (green) that it made it easy for me to lift the roses after they were completed. My cricut did eat one rose but I thought that was pretty good. I just kind of guessed based on the size of my shadow box and cut out three sheets of roses in each color. I did end up with extra roses but this was nice at the end because I could be picky about which roses I used.
I sorted each of the roses by color and ended up having roughly 6 of each color. Overall it was a pretty quick cut.
Step 2: Roll your roses
Using the quiling toll I started at the outside end of each rose and rolled it tightly. I found that the quiling tool lasted until about 1/2 way through the rose and then it was easier to take it off the tool and hand roll it.
After I rolled it I let each rose unroll and then used a glue dot to glue the bottom to the rose to hold everything together. This worked fairly well. I could imagine that hot glue could get really messy with this and I was glad that I chose glue dots instead.
My only beef with glue dots is that they have this tiny plastic coating on each dot. No matter how hard I try a few of them always get loose in my house and then I find them for months after and they are quite devilish. Perhaps next time I could use a small piece of double sided tape!
I passively rolled all these roses while watching a movie- this is a great tv watching project especially if you have a ton of roses to roll.
Step 3: Adhere your roses inside the shadow box
Originally the shadow box that I was using had a white back drop. I felt like this accentuated any potential flaws in the roses that I was using. So I got a piece of the darkest red that I used and cut it to fit the back of the shadow box. I felt this gave me a little more "forgiveness" and blended the roses well together.


You can see how the roses on the paper look fuller compared to the ones sitting on the table where you can see through them.
Step 4: Add vinyl to the outside of the shadow box
Using white permanent vinyl and cricut design space I printed my friends baby's name and her birthday. I didn't put any sealant or anything over the vinyl because I don't forsee her hanging it outside or somewhere where the vinyl will get picked on easily. And ta-da! I was done!


Comments
Post a Comment