Our Fireplace Facelift- The German Schmear Technique
Oh our fireplace- one of the banes of my existence. We knew after we got the inspection on the house that it was un useable and would require thousands of dollars in repairs to fix (the foundation of it was broken and the chimney had never been swept). And don't get me wrong- I love a good fire on a crisp fall evening or a summer night- but honestly, having a fire in my house scares me, plus all the mess. We had a gas fire place in our previous home and honestly we never used it because it was a pain to light and it made our gas bill shoot through the roof any time we turned it on. At our current house we have no gas hook up so we knew we would have to go electric.
In addition to it not being functional it was also extremely dirty and just basically an eye sore. I had previously tried scrubbing the whole thing, hoping that a little bit of elbow grease would restore it to it's former glory but, alas, no luck. I had thinking about what to do with it for over a year. I was hesitant to just paint it- I personally feel its a little sacrilege to fully paint brick but I've also seen it look really nice. In the end I found this technique called the "German Schmear" and I decided to try it.
The official "before" picture. I just felt like it looked so dingy and gross.
We removed the old fire place insert and used the extra space to create a closet in our half bathroom (see this blog post)
The German Schmear technique
We bought a bag of basic white mortar and mixed it. From the hardware store we purchased what is called a "mortar bag" this is essentially an icing bag for mortar. We also used a trowel which we already owned but you would need to purchase if you didn't have one.
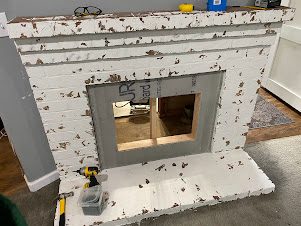
We mixed the mortar and poured it in the mortar bag. From there I ran a line of mortar on top of the existing mortar lines between the bricks. From there I took my trowel and "schemear" it across the bricks randomly. Now you can be as liberal or conservative with the mortar as you want with this- I decided to apply the mortar more liberally and cover a lot of the bricks. This is mostly because they were so dirty and dark and I only wanted a little bit of color to shine through. I've also see pictures of this done more conservatively and I think it also looks nice but you have to start with non-dirty bricks.
Pro tips: start on one side with the schemearing until you get your groove down and how much you want to cover- that was the not as pretty parts aren't right in the middle. Also work top down- because mortar drips down and you don't want new mortar covering what you've already done.
Tiling and the fire place insert
So the actual insert we bought from Wayfair kind of impulsively. They were having a sale to compete with amazon prime day and this purchase kind of sparked us to get going on this project that we had been talking about for a year and a half. I swear that we measured the fireplace opening when we bought the insert but when it came it was ver small for the actual opening we created. Rather than spending more money and trying to buy a new one we decided to add tile around the opening to compensate.
My husband built a frame for the fireplace insert and put cement board on it so we could apply the tile. I went with a black matte subway tile and charcoal grout. I honestly didn't want to bring to much attention to the tile- I wanted the insert to be the focal point instead.
The tiling did not take the long- an hour to two maybe. Subway tile is very easy to work with and very forgiving- this is why I often choose it. Also it's a classic look it doesn't go out of style.

This is the fire place with the tile and the grout.
After the tiling was completed we put in the insert. We were able to have the fireplace completed just in time for christmas! It was so cozy and I decorated it.
Building the Mantel
Ever since we bought the house I felt like the mantel on this fireplace was lacking. In my opinion a mantel should be a main focal point of the fire place- this mantel just sort of blended in. I've always liked the look of a beam mantel with a brick fireplace. However beams are super expensive and super heavy so we decided to go an alternative route. We bought seperate boards and glued them together. They rest directly on the old mantel- we drilled right into it to secure it. From straight on it looks like a beam but if you look at it from the sides you can see that it is made up of two different boards. I've heard of buying something that would cover up the seams in the wood but honestly it really doesn't bother me. We decided to stain the wood "Provincial" from Minwax which is the same as our floors.
Also I would've had more pictures of this but my husband did it while I was at work one day and he doesn't take any pictures.
Finishing Touches
We waited until after we installed our new floors and then we put white quarter round along the entire edge to give it and overall finished look.
I am so happy with how this turned out!! It lightens up the room so much and has turned it from an eyesore to a focal point!


Comments
Post a Comment