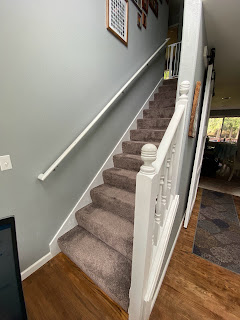
Our Staircase Facelift
One of our last little projects inside our house was giving our staircase a facelift. Now to be fair it's wasn't THAT bad- functionally it was fine. The previous owners of our house had painted over the original wood with white paint in order to make the staircase feel more modern. Now this violates a major rule of home renovation: Don't paint things that people touch!!!! Seriously don't. I know you see it all the time on instagram and pintrest but it's a bad idea. Overtime the natural oils in your hands will break down and discolor the paint. Any high touched surfaces you should stick with staining and polyurethaning the wood to protect it. In addition the previous owners had decided to paint the hand rails white which showed every smudge and piece of dirt ever. It was driving me crazy!
Now I debated saving some money and stripping the wood but this idea lasted about 3 seconds. I realized the wood underneath the paint was particle board which does not stain well or look good in general. We were able to save the spindles and thus save ourselves a little bit of money.
The hardest part of this project for me was learning the specific names of everything- it was hard to search for it without knowing the specific name.
The Newell Post- is the fancy piece at the end of the staircase. This is one of the pieces that we decided to invest the most money in. We purchased one from Home Depot made of solid wood. I wanted something with a nice grain because it is very prominent not only for our staircase but for our home. I figured this would be the place to have a high quality item. I stained the post "Provincial" from Minwax which is also the same stain as our wood floors. It's also very important that you put multiple coats of polyurethane on it because it will be touched daily and you want it to withstand all the oily hands. My husband and father installed it using a newell post installation kit that comes with trim to hide the screw holes you need to anchor it into the ground. Make sure you install this correctly as it anchors your entire stair rail and people put their weight on it to go up and down the stairs.
The Newell post before I stained it and after we installed it
Our next investment piece we bought was a 16 foot oak handrail also purchased from Home Depot- this one had to be somewhat planned because of it's length- we purchased it well in advanced while we were buying some larger items and borrowed a friends truck. Again we figured this would be touched multiple times a day so we wanted to spend the extra money and go high quality. We also purchased 6 handrail anchors to make sure it would be very secure on the wall. We stained and applied polyurethane before installing.
The bottom part of the rail that the spindles go into is called the "shoe rail". This comes with a separate piece of wood that you cut and install around the spindles to hide the nails and screws you use to anchor the spindles. Like I said previously we ended up saving the spindles to save some money. I lightly sanded them and reapplied a coat of paint. I like the contrast the white spindles have with the dark wood. With the exception of my toddler no one really touches the spindles so I figured it was safe to paint them. We also bought a cheaper shoe rail- we could've purchased an oak one to match but because it's on the bottom and most people don't pay attention to it we went with the cheaper pine version. Now obviously if you look very closely at the pine vs the oak you can tell the difference in quality and there is a slight difference in the color of the stain but to the untrained eye you really can't tell the difference.
The shoe rail before I stained it
We also purchased a small four foot section of hemlock hand rail to go on the side with the spindles. We did not purchase the oak because you could only purchase it in 16 foot sections and those were a pretty penny to spend to only use 3 feet of it. Again we figured this smaller handrail wouldn't be used as often compared to the long one and that most people would not notice the difference between the two.
Overall- we are really happy with our staircase facelift- it makes our house feel complete and cohesive instead of looking like someone put lipstick on a pig. It was a little more expensive than we were really wanting to spend but it's something that gets used every day and it was worth the investment for us.


Comments
Post a Comment