We technically weren't planning this project originally when we bought our house. The previous owners had installed a deck and a brick paver patio in the backyard. We redid the deck about 2 years ago (see this blogpost: https://craftytravelgirl.blogspot.com/2023/01/refinishing-deck-with-behr-deck-over.html ) and had planned on leaving the patio alone. We could tell that the previous owners hadn't installed it correctly- but it didn't bother us enough to redo. We've done patios in the past at our previous house and we knew how much of a pain they were to install yourself.
What really bothered us was the upkeep on this patio. Because of where it was installed it gets no sunlight in the winter and never dries out. Therefore it grows a ton of mold. We've tried things in the past such as hot water, vinegar etc to clean it but it never worked for us. Every summer I would spend HOURS cleaning this thing and it was a huge pain because you literally had to power was each individual brick. I would literally get covered in dirt and sand and immediately that fall it would be filthy again.
What started this whole project was my husband has been wanting a hot tub ever since we moved into this house (well really before that but since moving here it's increased). Over the last few months he had slowly talked me into it. We were planning on having a concrete pad installed next to the patio to put the hot tub on. As we were measuring for this concrete pad to start getting estimates we started talking about how much of a pain the patio was and we decided to ask how much extra it would be to do the whole thing to give it more of a cohesive look. Basically we were already paying for the labor and truck the extra cost was the material so we decided to pull the trigger and redo the entire thing.
Now don't get me wrong- we may have been able to do this ourselves- but one thing I've learned as I'm now in my 30s is that sometimes it's just better to pay a professional to do something. If this was a small square or pad or something maybe we would consider it but by the time you do the prep work to level it and then mix the concrete and have it set right it would just be better to pay someone who does this on a daily basis.
The BEFORE
Phase 1: Remove the current pavers
We decided to save ourselves a little money and pull up the pavers ourselves. Now I say "ourselves" but in full honesty it was my husband who did this because I was in my third trimester of pregnancy when this was all happening. We did have some friends come over and help us on day so that really helped. Because they weren't installed correctly they came up very easy. We saved all the pavers and I have plans for them but it probably won't happen until later in summer or next year just depending on other things that happen.
Phase 2: Pour the Concrete Patio
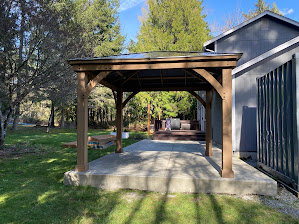
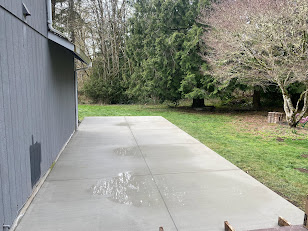
We had a concrete company come and pour the patio. Normally we are "DIY"ers but in this case this is way out of comfort zone and should be left to the professionals. They prepped one day and then came back the next day to pour the patio. We think it turned out great!!
Phase 3: Build the Gazebo
We knew we wanted to build some sort of structure to go over an eventual hot tub so that we could protect the hot tub and we could use it in the rain- which happens a lot here in the PNW. We looked at a variety of different gazebo and debated designing one. At the end of the day we ended up purchasing a kit from Costco. Cost wise it was roughly the same as if we were to design one and we were happy that it came with a metal roof instead of a shingle roof that we were probably going to end up using. Plus the entire thing was delivered to our house for free and all the of the pieces were pre-cut and pre-drilled. That alone probably saved us 2-3 days worth of work. We didn't have to figure out everything we needed, go to the and purchase all the lumbar, spend a day cutting every thing. Plus it's all weather proofed already. Again as I get older and have kids I have begun to realize that sometimes it's worth it to spend a little extra money to save 2-3 days worth of time on a project.


Phase 4: Install Privacy wall
We wanted to install a privacy wall around the gazebo just to make it feel more intimate when we finally install the hot tub. It also makes the flow of the space more cohesive and forces people to walk around the gazebo rather than accessing the patio from behind the shipping container. We purchased prefabricated fence pieces from home depot and connected them together with 4x4s that we cemented into the ground. Honestly I feel like this really completed the look I was going for with this space.
Phase 5: Build planter boxes
This was kind of last minute addition but I decided to construct some planter boxes to go on the far corner of the patio- to make it strong enough to eventually hold a hot tub it had to be pretty thick- this made for a large step off the patio. I was worried for my kids and their friends falling off the patio or tripping so I wanted to build planter boxes to force them to step onto the patio in a different spot. We constructed them with left over cedar from the privacy fence so that they would match.
Phase 6: Install Fire pit
There was a fire pit on the previously patio space so we just decided to save the pavers when we deconstructed it. The previous home owners had not used any fire resistant adhesive when they installed it so it came apart very easily. We also purchased a fire pit cover to go over top to keep the rain out of it and give it a more finished look when not in use.
Overall:
Overall we are really happy with how everything turned out. Currently installing the hot tub is on hold until I return to work after maternity leave and we have more cash flow to purchase a hot tub. But for now we are having a fun time playing with our toddler on the patio.


Comments
Post a Comment